
Sharpening Supplies

If you are new to sharpening, all you need is a hone and a stone to get started.
We offer some of Bob’s favorite products for sale on our website.
Japanese water stones are simple to use and provide excellent control to obtain a razor sharp edge.
Knife Honing 101
 A hone is a regular maintenance tool to be used as often as you feel necessary. Its purpose is to align the blade’s edge and increases efficiency. The trick is the right pressure and the right angle.
PRESSURE
Grab your knife by the handle and press the blade on a kitchen scale until you reach 4 – 6lbs of pressure.
ANGLE
Hold the blade against the hone and place a matchbook in between the hone and the blade (10 – 15 degree angle). See image (right) as a guide.
HONING STEP-BY-STEP
1) Anchor the tip of the hone on a cutting board.
2) Place the edge of the blade against the hone at a 10 – 15 degree angle.
3) Put your finger at the heel of the blade, and press into the steel.
4) Keeping the angle, pull the blade down in an arching motion from heel to tip.
5) Repeat 4 – 8 times on each side of the blade, moving from moderate pressure (4 – 6lbs) to lighter pressure.
6) When finished, do the magazine test or onion test to check your work.
Water Stones
When the hone no longer brings the edge back to the sharpness you desire, it is time to use a water stone to make a new edge.
Start with a 1000 or lower grit stone to remove material and make a burr or wire edge. If your edge is in rough shape use a 400 grit stone to set your edge, then move to a higher grit stone to polish the edge.
The trick is maintaining a consistent angle and keeping even pressure across the blade (see guides for honing above).
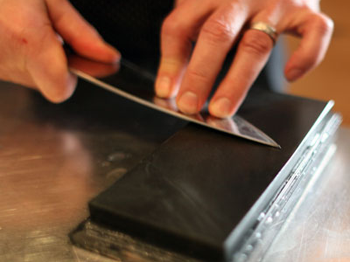
Using a Water Stone, Step-by-Step
PREPARING THE WET STONE
Determine if your stone needs to be soaked by squirting water on the surface, if it absorbs then it needs to soak. Submerge the stone in water for 10 minutes and when the bubbles stop, take the stone out of the water and set the stone on a flat surface.
The Bob Kramer ZWILLING Sharpening Stones found in our store require soaking.
STONING THE BLADE
- Use the same 10 – 15 degree angle as with the hone.
- Start with about 4 – 6 lbs and end with about 2 – 3 lbs of even pressure across the blade.
- If you’re right-handed, hold the handle in your right hand and spread your left fingers across the blade for even pressure.
- Keeping that angle, move the blade straight back and forth or make an arcing motion across the stone (pull the knife towards you, heel to tip, making a swooping motion on the stone).
- Flip the blade and repeat on the other side.
- When you can feel the wire burr form from tip to heel, it’s time to move to a finer grit stone to polish the edge.
POLISHING THE BLADE
- Repeat the steps stated above with a finer grit stone, lightening pressure as you go.
- After using the finer grit stone and while it is still wet, scrub it with the Nagura Stone to create a slurry on the surface for extra polish.
- When you’re finished, wipe the metal residue off of your blade, rinse and dry the stones.

How to Care for Your Water Stones
MAINTENANCE
Keep your stones clean and cutting easily. The finer grit stones (1000 grit and higher) build metal residue that needs to be cleaned. After using the stone, and while still wet, scrub with the Nagura Stone. This will create a ‘slurry’ on the surface. Sharpen the blade for a few strokes in the slurry for extra polish.
Keep your stone flat. Wet stones tend to wear more in the center, which needs to be corrected for even sharpening. With a pencil draw an X on top corner to corner. Wet the stone and rub it with the Naniwa Flattening Stone until it is flat and you can no longer see the X. You can also use a sheet of silicon carbide sandpaper on a flat surface with a little water on the back.
CLEANING
Rinse with cold or lukewarm water and air dry your stone before storing. Do not use soap, or hot water, and do not dry with a fan. Doing so may damage the stone.
STORAGE
Wet stones should be stored indoors at room temperature in a clean, dry place. Do not store in water, direct sunlight, or the cold garage.